Why Gokyo Ri Has The Best Everest View
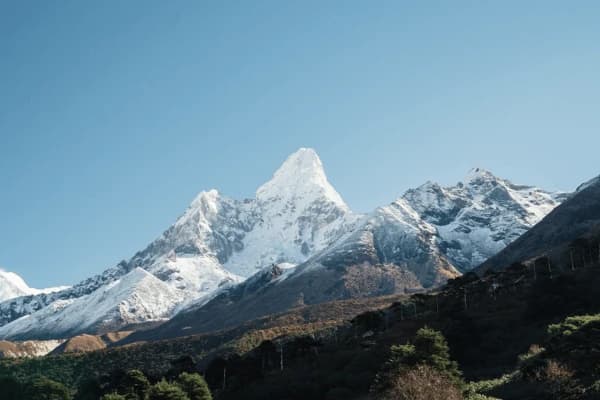
Speaking from my personal experience, I’m confident that Gokyo Ri stands tall with the best Everest view in the Everest Region. Located above the Gokyo Lakes in the Khumbu Region of northeastern Nepal, within Sagarmatha National Park near the village of Gokyo, this viewpoint rewards trekkers with an incredible Himalayan panorama. From the summit, you’ll be fully amazed by the stunning panorama of four snow-capped giants. They are as follows:
- Mt. Everest (8,848.86 m/21,031.69 ft), the world’s highest peak
- Lhotse (8,561 m/27,940 ft)
- Makalu (8,485 m/27,838 ft)
- Cho Oyu (8,188 m/26,864 ft)
This magical view of Nepal’s Himalaya makes Gokyo Ri unique from other viewpoints in the country. Many people compare Gokyo Ri with Kala Patthar (5,555 m/18,225.07 ft). However, my experience says that both viewpoints have different wonders to offer trekkers.
Kala Pattharis so near Mount Everest. Thus, it displays a straight view. But it lacks the 360-degree vista of the Mahalangur Range that Gokyo Ri offers. In addition, Gokyo Ri offers a breathtaking view of Gokyo Lake with Dudh Pokhari (the 3rd lake) from its summit. You’ll find the landscape perfect for photography.
For an even better angle of Sagarmatha, I strongly recommend reaching a bit further to Ngozumpa Tsho (the 5th Lake). You can capture the north face of the world’s highest peak from here more clearly compared to the view from Gokyo village or the 3rd Lake.
Mixed with the massive Ngozumba Glacier extending beside you, the entire adventure feels more real, quiet, and immersive. It’s something you cannot experience on the regular EBC Trek.
Gokyo Ri Trek Route Options
It varies depending on your time, fitness level, and the type of adventureyou prefer in the Khumbu Region to choose the right trail option for the Gokyo Ri Trek. A small change in route from calm high-altitude settlements to the busy EBC trail can thoroughly shape your trip.
Refer to the table below to know the duration, difficulty level, elevation, and daily walking hours of each option before fixing the trail:
|
Route Option
|
Avg. Duration
|
Max. Elevation
|
Walking Hrs /Day
|
Difficulty |
Best For
|
|
Classic Gokyo Ri
|
10-12 Days
|
5,357 m (17,575 ft)
|
5-6 Hours
|
Moderate |
Beginners and Photographers
|
|
Gokyo via Namche Bazaar
|
11-13 Days
|
5,357 m (17,575 ft)
|
5-7 Hours
|
Moderate
|
Cultural Enthusiasts
|
|
Gokyo with EBC
|
15-18 Days
|
5,420 m (17,782.15 ft)
|
6-8 Hours
|
Challenging |
Hard Adventure Seekers |
Classic Gokyo Ri
This Classic Gokyo Ri is the direct and peaceful way to reach Gokyo Ri. You’ll take another route through beautiful Sherpa villages such as Dole and Machhermo before arriving in the turquoise Gokyo Lakes from Namche Bazaar.
As the ascents are steady and well-paced for acclimatization, you’ll feel comfortable even after walking for around 5 to 6 hours each day. I can say with confidence that the path is ideal for you if you prefer beautiful views with fewer crowds.
Gokyo Via Namche Bazaar
This route offers more time around Namche Bazaar, the Sherpa capital of the Everest Region. Walking 5 to 7 hours a day involves slow ascent and panoramic ridge hikes, particularly to Mong La.
If you’re interested in communicating with locals, visiting monasteries, and gradually getting familiar with high elevation, this option feels more immersive rather than rushed. I often recommend it to beginners who wish to experience both mountain scenery and Sherpa culturein a single journey.
Gokyo With EBC
This Gokyo with EBC trial is an excellent choice for you if you’re a hard adventure lover, as it blends Gokyo Ri with EBC. You’ll cross the challenging Cho La Pass (5,420 m/17,782 ft). This option is more rugged, involving 6 to 8 hours of walking per day.
Having good fitness is essential because this route includes glacier crossings and steep ascents. From my experience, this is the best option for strong hikers who are looking for both the breathtaking Gokyo Ri viewpoint and the EBC adventure in one journey.
12-Day Gokyo Ri Trek Itinerary
Day 1: Fly to Lukla (2,860 m) and Trek to Phakding (2,610 m)
Take an exciting mountain flight to Tenzing Hillary Airport in Lukla, then begin a gentle trek along the Dudh Koshi River to Phakding.
This is a short and easy walk of about 3 - 4 hours, helping you gradually start the journey.
Day 2: Trek from Phakding to Namche Bazaar (3,440 m)
Follow the scenic trail through pine forests and suspension bridges inside Sagarmatha National Park.
After a steady climb, reach the lively Sherpa town of Namche Bazaar.
Day 3: Acclimatization Day at Namche Bazaar
Spend the day adjusting to the altitude with a short hike to viewpoints above Namche.
Proper acclimatization helps your body adapt to thinner air and reduces the risk of altitude sickness (see our Everest acclimatization tips).
Day 4: Trek from Namche Bazaar to Dole (4,040 m)
Leave the main Everest Base Camp trail and follow a quieter route toward the Gokyo Valley.
The trail offers panoramic views of Everest, Lhotse, and Ama Dablam along the ridge.
Day 5: Trek from Dole to Machhermo (4,470 m)
Continue gradually through alpine landscapes and small yak pastures.
The peaceful village of Machhermo is a common stop for trekkers heading to Gokyo.
Day 6: Trek from Machhermo to Gokyo (4,790 m)
Walk beside the massive Ngozumpa Glacier, the longest glacier in Nepal.
Soon you’ll reach the stunning turquoise Gokyo Lakes and the village of Gokyo.
Day 7: Summit Gokyo Ri (5,357 m) at Sunrise
Start before dawn for the hike to Gokyo Ri.
From the summit, enjoy breathtaking views of Mount Everest, Lhotse, Makalu, and Cho Oyu.
Day 8: Explore Gokyo Valley and Return to Dole
Enjoy a peaceful morning around the lakes before trekking back down.
Descend gradually to Dole with spectacular glacier views along the trail.
Day 9: Trek from Dole to Namche Bazaar
Follow the scenic ridge trail back toward Namche Bazaar.
Enjoy mountain views and comfortable teahouses after several days in higher altitude.
Day 10: Trek from Namche Bazaar to Phakding
Retrace the trail through forests and suspension bridges along the Dudh Koshi River.
This descent is easier and takes about 5–6 hours.
Day 11: Trek from Phakding to Lukla
Complete the final section of the trek back to Lukla.
Celebrate the successful journey with your trekking team in the evening.
Day 12: Fly from Lukla to Kathmandu
Take an early morning flight back to Kathmandu with incredible aerial views of the Himalayas.
Your unforgettable Gokyo Ri Trek adventure officially ends here.
Gokyo Ri Trek Cost Breakdown
When planning your trek to the Gokyo Ri, it’s essential to understand the total costs before commencing the journey. According to my experience, season, comfort level, and group size vary the expense. The following factors influence the price:
- Flight
- Permit
- Guide or Porter
- Daily Meals
- Accommodation
Here’s the table below for your convenience, showing a clear average cost for this beautiful Himalayan trek in Nepal:
|
Expense Category
|
Average Cost
|
Notes |
| Flight |
USD 180-220
|
Two-way trip from Kathmandu. Considered early booking in peak trekking seasons.
|
| Permit |
USD 50-70
|
Includes Sagarmatha National Park and Khumbu Pasang Lhamu Municipality Entry Permits.
|
|
Guide or Porter
|
USD 25-40 per day
|
An experienced guide is highly recommended. A porter is optional but helpful.
|
|
Daily Meals
|
USD 20-35 per person per day
|
Teahouse meals get expensive as you gain elevation.
|
|
Accommodation
|
USD 5-15 per person per day
|
Basic rooms; slightly higher cost in locations like Gokyo |
Spring (March to May) and autumn (September to November) are the peak trekking seasons. During these times of year, airfare is slightly higher.
During the winter and monsoon seasons, airfare is cheaper; nonetheless, good weather and visibility aren’t guaranteed. Therefore, always plan your budget with some flexibility.
Difficulty, Fitness & Who This Trek Is For
The difficulty of the Gokyo Ri Trek is moderate. However, since you reach a height above 5,000 m (16,404.2 ft), the journey looks challenging, especially for beginners. Based on my experience, it’s still achievable for them if prepared well, because there’s no technical section, just steady walking for several hours each day in an alpine location.
| Factor |
Details |
Notes |
|
Highest Elevation
|
5,357 m (Gokyo Ri Summit)
|
Expect thin air. Acclimatization days are included.
|
|
Trek Difficulty
|
Moderate to Challenging
|
No technical climbing. Requires stamina for daily hikes.
|
|
Fitness Requirements
|
Moderate Endurance
|
At least a month of pre-trek cardio is strongly recommended.
|
|
Altitude Sickness Risk
|
The risk of AMS is higher above 2,500 m (8,202.1 ft).
|
To prevent the risk, drink enough water, rest on acclimatization day, and obey your guide.
|
|
Suitable For
|
Beginners with proper preparation
|
Families with kids, photographers, and cultural travelers.
|
|
Best Preparation Tips
|
Short hikes, stair climbs, and cardio
|
Review the Everest Trekking packing list for gear and clothing.
|
|
Summit Timing Advice
|
Early morning for clear views
|
Avoid the afternoon for photography, as the clouds may cover the sky. |
Overall, the Gokyo Ri Trek is ideal for trekkers who want spectacular Everest views without the heavy crowds of the Everest Base Camp route. Beginners can complete the trek successfully if they prepare with basic cardio training and follow proper acclimatization. However, people with serious altitude sensitivity or limited hiking experience may find the high elevation challenging.
Weather, Visibility & Best Time for Clear Everest Views
It’s crucial to learn about the weather for the best views on the Gokyo Ri Trek. Choosing the right season and hiking early in the day makes a huge difference in visibility and overall experience.
| Topic |
What Happens
|
Simple Advice For Trekkers
|
Why It Matters
|
|
Best Season (Spring)
|
March to May has stable weather and good views
|
Good time if you want to see blooming wildflowers and mountain views.
|
Comfortable trekking and clear skies.
|
|
Best Season (Autumn)
|
September to November has the clearest sky and great visibility.
|
Best time for beginners.
|
The chance to witness Mt. Everest clearly is high.
|
|
Winter Conditions
|
Very clear sky but frigid temperatures (below -20°C)
|
Only plan if you’re familiar with cold weather and have strong winter gear.
|
Difficult for first-timers, but the views can be perfect.
|
|
Monsoon Season
|
June to August has unstable weather, mostly cloudy skies, and heavy rainfall.
|
Not recommended for trekking.
|
Mountain views are often blocked by clouds.
|
|
Morning Weather
|
The sky is usually clear in the early morning.
|
Start hiking before dawn.
|
Best photos from the summit.
|
|
Afternoon Weather
|
The sky gets cloudy in the afternoon.
|
Plan summit climb early.
|
Views may not be clear in the afternoon.
|
|
Visibility from the summit
|
From Gokyo Ri, Everest, Makalu, and Cho Oyu are clearly visible.
|
Hike early for stunning panoramas.
|
The main reason people do this trek is the heavenly morning views.
|
|
Temperature (spring/autumn)
|
Day 5 to 12°C, Night -8 to -12°C
|
Bring warm layers and gloves.
|
Nights are very cold, even in the good season.
|
|
Best Photography Time
|
Sunrise creates golden light on Everest.
|
Wake up early for the summit push.
|
Best photos and clear mountain lines. |
If you desire to see clear views of Mt. Everest and other surrounding peaks, plan your journey in spring or autumn, and aim for an early morning summit. Afternoon time isn’t recommended, as clouds mostly block the mountains. So, choose the right time and prepare well for breathtaking views that help you make this adventure truly memorable.
Essential Tips for Gokyo Ri Trek
Here are some essential tips for you if you’re planning to do the Gokyo Ri Trek:
- Start your hike early in the morning to reach Gokyo Ri before dawn for sunrise views.
- Bring your own bottle and water purification tablets or a filter. Avoid buying a water bottle, as it’s expensive at higher elevations.
- Pre-book your round-trip flights to Lukla at least 2 to 3 weeks early in peak trekking seasons: spring and autumn.
- Always get travel insurance that includes high-altitude trekking (above 5,000 m) and helicopter rescue.
- Hike gradually and follow acclimatization days to adjust your body to the reduced oxygen level and prevent acute mountain sickness (AMS), which begins happening above 2,500 m.
- Withdraw enough cash (NPR) in the city, as there are no ATM booths available after Namchhe Bazaar.
- Using the internet, hot showers, and charging gadgets costs extra, so use services only when it’s necessary.
- Pack warm clothes, such as down jackets, gloves, and a woollen hat, to handle the freezing temperatures at night.
- Don’t compromise eating foods even if you don’t feel like eating them because of tiredness.
- Talk to your guide immediately if you feel any signs of AMS, such as headache, trouble sleeping, or vomiting, happening.